
Thoma Guide
“Hey… how about we go for a nice meal some time? My treat, of course.”
GRADE: 4-STAR
VISION: Pyro
WEAPON: Polearm
HOW TO GET: Event Banner, Wishes in General
GOOD FOR: Spiral Abyss, Artifact Farming, Bosses, Shield, Fishing (Inazuma)
THOMA MAX STATS
(LvL 90 / Ascension Phase 6)
HP: 10,331 ATK: 202 DEF: 751 BONUS: ATK +24%
THOMA VIDEO GUIDE
THOMA LEVEL ASCENSION MATERIALS
SWIPE TO CONTINUE VIEWING ->
| Material | Lvl 20 | Lvl 40 | Lvl 50 | Lvl 60 | Lvl 70 | Lvl 80 |
|---|---|---|---|---|---|---|
 Agnidus Agate Sliver (1) Agnidus Agate Sliver (1) | 1 | 0 | 0 | 0 | 0 | 0 |
 Agnidus Agate Fragment (9) Agnidus Agate Fragment (9) | 0 | 3 | 6 | 0 | 0 | 0 |
 Agnidus Agate Chunk (9) Agnidus Agate Chunk (9) | 0 | 0 | 0 | 3 | 6 | 0 |
 Agnidus Agate Gemstone (6) Agnidus Agate Gemstone (6) | 0 | 0 | 0 | 0 | 0 | 6 |
 Smoldering Pearl (46) Smoldering Pearl (46) | 0 | 2 | 4 | 8 | 12 | 20 |
 Fluorescent Fungus (168) Fluorescent Fungus (168) | 3 | 10 | 20 | 30 | 45 | 60 |
 Treasure Hoarder Insignia (18) Treasure Hoarder Insignia (18) | 3 | 15 | 0 | 0 | 0 | 0 |
 Silver Raven Insignia (30) Silver Raven Insignia (30) | 0 | 0 | 12 | 18 | 0 | 0 |
 Gold Raven Insignia (36) Gold Raven Insignia (36) | 0 | 0 | 0 | 0 | 12 | 24 |
 Mora (420,000) Mora (420,000) | 20,000 | 40,000 | 60,000 | 80,000 | 100,000 | 120,000 |
THOMA TALENTS / SKILLS
Normal Attack: Performs up to four consecutive spear strikes.
Charged Attack: Consumes a certain amount of Stamina to lunge forward, dealing damage to opponents along the way.
Plunging Attack: Plunges from mid-air to strike the ground below, damaging opponents along the path and dealing AoE DMG upon impact.
Blazing Blessing (Elemental Skill): Thoma vaults forward with his polearm and delivers a flame-filled flying kick that deals AoE Pyro DMG, while also summoning a defensive Blazing Barrier.
At the moment of casting, Thoma’s Elemental Skill applies Pyro to himself.
The DMG Absorption of the Blazing Barrier scales off Thoma’s Max HP.
The Blazing Barrier has the following traits:
- Absorbs Pyro DMG 250% more effectively.
- When a new Blazing Barrier is obtained, the remaining DMG Absorption of an existing Blazing Barrier will stack and its duration will be refreshed.
The maximum DMG Absoprtion of the Blazing Barrier will not exceed a certain percentage of Thoma’s Max HP.
DURATION: 8s COOLDOWN: 15s
Crimson Ooyoroi (Elemental Burst): Thoma spins his polearm, slicing at his foes with roaring flames that deal AoE Pyro DMG and weave themselves into a Scorching Ooyoroi.
Scorching Ooyoroi
While Scorching Ooyoroi is in effect, the active character’s Normal Attacks will trigger Fiery Collapse, dealing AoE Pyro DMG and summoning a Blazing Barrier.
Fiery Collapse can be triggered once every 1s.
Except for the amount of DMG they can absorb, the Blazing Barriers created in this way are identical to those created by Thoma’s Elemental Skill, Blazing Blessing:
- Absorbs Pyro DMG 250% more effectively.
- When a new Blazing Barrier is obtained, the remaining DMG Absorption of an existing Blazing Barrier will stack and its duration will be refreshed.
The maximum DMG Absorption of the Blazing Barrier will not exceed a certain percentage of Thoma’s Max HP.
If Thoma falls, the effects of Scorching Ooyoroi will be cleared.
DURATION: 15s COOLDOWN: 20s ENERGY COST: 80s
THOMA PASSIVE
Imbricated Armor: When your current active character obtains or refreshes a Blazing Barrier, this character’s Shield Strength will increase by 5% for 6s.
This effect can be triggered once every 0.3 seconds. Max 5 stacks.
- Unlocked at Ascension 1
Flaming Assault: DMG dealt by Crimson Ooyoroi’s Fiery Collapse is increased by 2.2% of Thoma’s Max HP.
- Unlocked at Ascension 4
Snap and Swing: When you fish successfully in Inazuma, Thoma’s help grants a 20% chance of scoring a double catch.
- Unlocked Automatically
THOMA TALENT ASCENSION MATERIALS
Requirements to Max (Crown) 1 Talent
SWIPE TO CONTINUE VIEWING ->
| Material | Lvl 2 | Lvl 3 | Lvl 4 | Lvl 5 | Lvl 6 | Lvl 7 | Lvl 8 | Lvl 9 | Lvl 10 |
|---|---|---|---|---|---|---|---|---|---|
 Teachings of Transcience (3) Teachings of Transcience (3) | 3 | 0 | 0 | 0 | 0 | 0 | 0 | 0 | 0 |
 Guide to Transcience (21) Guide to Transcience (21) | 0 | 2 | 4 | 6 | 9 | 0 | 0 | 0 | 0 |
 Philosphies of Transcience (38) Philosphies of Transcience (38) | 0 | 0 | 0 | 0 | 0 | 4 | 6 | 12 | 16 |
 Treasure Hoarder Insignia (6) Treasure Hoarder Insignia (6) | 6 | 0 | 0 | 0 | 0 | 0 | 0 | 0 | 0 |
 Silver Raven Insignia (22) Silver Raven Insignia (22) | 0 | 3 | 4 | 6 | 9 | 0 | 0 | 0 | 0 |
 Gold Raven Insignia (31) Gold Raven Insignia (31) | 0 | 0 | 0 | 0 | 0 | 4 | 6 | 9 | 12 |
 Hellfire Butterfly (6) Hellfire Butterfly (6) | 0 | 0 | 0 | 0 | 0 | 1 | 2 | 2 | 2 |
 Crown of Insight (1) Crown of Insight (1) | 0 | 0 | 0 | 0 | 0 | 0 | 0 | 0 | 1 |
 Mora (1,652,500) Mora (1,652,500) | 12,500 | 17,500 | 25,000 | 30,000 | 37,500 | 120,000 | 260,000 | 450,000 | 700,000 |
THOMA ARTIFACTS / WEAPONS
best artifacts for Thoma
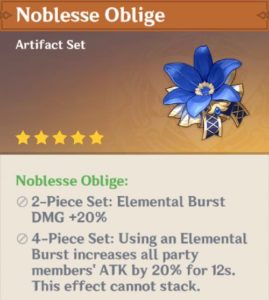
nOBLESSE OBLIGE LOCATION

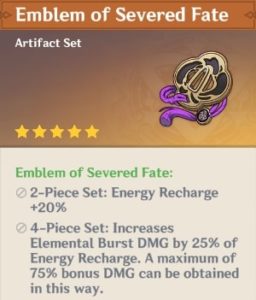
EMBLEM OF SEVERED FATE LOCATION

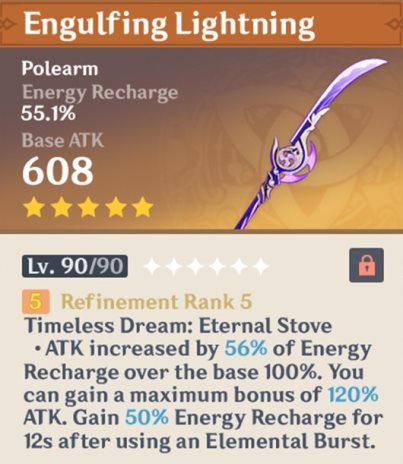
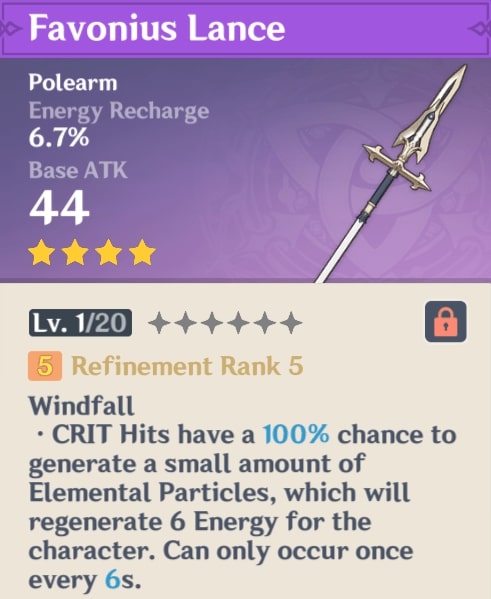
best Weapons for Thoma
THOMA BUILDS / STRATEGY

HP | ATK | ER%/HP% | HP% | HP%
SHIELD SUPPORT: This is hands down the best build to get the most use out of Thoma. Since his shield scales off of his HP then you need to get as much on him as possible along with ER to keep it up more often.
Once you have the first taken cared of, you can start adding damage on him with ATK, Pyro Dmg, CR, and CD. It’s good to start adding damage on him to make runs faster and more efficient.
These are also general recommendations, you will need to alter your artifacts and stat builds based on what content you want to use this character for and what team you are using him/her with, however, these are consider among the best polearms for Thoma. A general rule for DPS units are CR is roughly 50% of your CD.
THOMA CONSTELLATIONS

A Comrade’s Duty (Lvl 1): When a character protected by Thoma’s own Blazing Barrier (Thoma excluded) is attacked, Thoma’s own Blazing Blessing CD is decreased by 3s, while his own Crimson Ooyoroi’s CD is decreased by 3s.
This effect can be triggered once every 20s.
A Subordinate’s Skills (Lvl 2): Crimson Ooyoroi’s duration is increased by 3s.
Fortified Resolve (Lvl 3): Increases the Level of Blazing Blessings by 3.
Maximum upgrade level is 15.
Long-Term Planning (Lvl 4): After using Crimson Ooyoroi, 15 Energy will be restored to Thoma.
Raging Wildfire (Lvl 5): Increases the Level of Crimson Ooyoroi by 3.
Maximum upgrade level is 15.
Burning Heart (Lvl 6): When a Blazing Barrier is obtained or refreshed, the DMG dealt by all party members’ Normal, Charged, and Plunging Attacks is increased by 15% for 6s.
STRENGTHS / WEAKNESSES
STRENGTHS:
- Thoma is a niche shield in Genshin Impact.
- He’s simple to build.
- He pairs really well with Diluc or Yan Fei giving them ATK% buff with 2x Pyro Team, and his 6th constellation really buffs their damage.
- His constellations are really good in general and are all very useful.
WEAKNESSES
- He has a very limited role other than a shield.
- He fits in a very niche team.
RANKING
Combat Rating (7/10): His combat ability is very simple and easy to use as his role is just to put up his shield. It does get a little tricky since you need to remember to put up his E before his Burst so you can stack the shield.
Exploration (2/10): Other than boosting fishing in Inazuma, he doesn’t really do anything in terms of exploring the map.
Spiral Abyss (6/10): He’s actually really good here with a Pyro DPS like Diluc or Yan Fei especially with his 6th constellation. His boost in their damage helps to make your runs faster. However, he doesn’t really fit into a lot of team comps which is why his score is lower.
Artifact Farming (7/10): He serves a similiar role here as he does in Spiral Abyss.
Normal/Weekly Bosses (8/10): Pair him with the right dps characters and you’l wipe the bosses in no time.
